This is the second part in my tutorial for converting a board game for a touch table using unity.
The first part covered all our reuse code and conventions, setup the project and created a main menu.
This part will build the game and player UIs for a very simple game called “No Thanks!”.
There is a set of videos to go along with this post which show all the steps that I perform in the Unity game builder.
I’ve also saved my Unity project at a few points along the way so that you can skip ahead or make sure that your project matches mine.
- NoThanks-MainMenu (steps 1-6 complete)
- NoThanks-UIBuilt (steps 1-10 complete)
- Touch – Describes multi-touch handling in Unity and passing touch events to the Unity UI
- Utilities – Covers all the utility classes and functions that we’ve created over time
- Game Model – The “Model” part of the Model/View/Controller pattern
- View – The skeleton classes for running the GUI
- Event System – The “Controller” part of the Model/View/Controller pattern
- Events – The events that are common to all our games.
Rules for the version of No Thanks! that I am implementing
Play starts with a deck of 33 “gifts” with a value of 3-35. High numbers are the worst gifts, but all gifts are bad. The deck is shuffled, 9 cards are removed and the first gift is turned face up.
Players start with 11 chips (less for 6 or 7 players) and, in turn order, can either pay a chip to the center or take the current gift and however many chips are in the center.
When a player takes a gift, they flip over the next card and must again pay a chip or take the card.
After all gift cards are taken, players throw away any gift card that is one greater than another gift they have taken. So if a player has taken 5,20,21,22,30,31. They would throw out 21,22 and 31. A player’s score is their chips minus the sum of the remaining cards.
Highest score wins.
Step 7 – Create a player area
Follow along with the video
The player area sits right in front of the player on the screen and contains UI elements to display their pieces/cards/etc and also has controls that player can use to interact with the game.
In “No Thanks!” the player area needs to show how many chips the player has, the cards that they have taken, their current score, and (at the end of the game) what place (1st, 2nd, etc) they got. The player area needs to have controls so that the player can pay a chip or accept the card. It is also nice for the player area to show the player’s chosen color and an indicator that it is their turn to play.
Switch to the GameCanvas by deactivating the MainMenu and activating the GameCanvas. Make a background image like we did for the main menu by adding an Image with the “background” sprite and set it to fill the canvas.
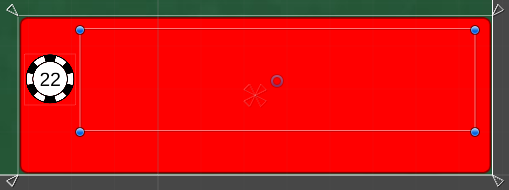
To make the Player Area, I’ll start by making an image with the border_0 sprite the same size as the login area (~600×200). Then I’ll add an image with the chip sprite with a child TextMesh object to display the count. I’ll put that on the left side. Then I’ll add an area to show the cards. That will be on the right side, take up most of the space (~425×128), and have a horizontal layout. Set the “Child Force Expand” to just height and “Control Child Size” to Both. Set the alignment to “Middle Center”.
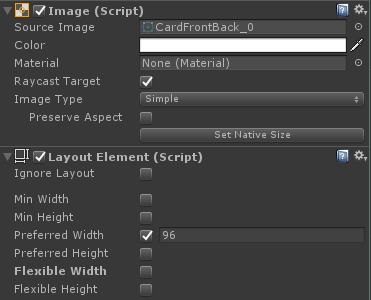
Next I’ll make a card to go into the card area. I have a card sprite asset to use for the image, and I’ll make the card 96×128. That should be very visible, but leave room for a player to take quite a few cards. I added a “Layout Element” with a preferred width of 96 to the card since I’m planning to add it to a Horizontal Layout.
I’ll put the value of the card in the center and upper left. The center text can be large so that it can be easily seen in the center of the table when players are bidding. The text on the upper left is so that the cards can be packed tightly together while the value is still visible.
Now I’ll make that card a prefab since I’m going to instantiate cards as needed during the game.
In Unity, a prefab is a “master copy” of something that you have several instances of. It allows changes made to one instance to be replicated to the others. I wouldn’t have to make the card a Prefab for this game. Instead I could have the “master copy” be the card in the center of the screen. The player areas could just make copies of this master whenever they need to add a card.
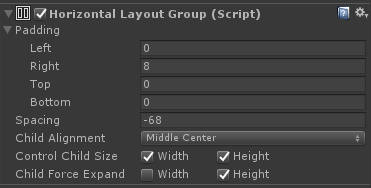
I want to group the cards that are part of a sequence together in the player area. To do this, I’m going to set the spacing of the horizontal layout to -68. This will push all the cards together. Then I’ll add a blank “spacer” element between groups of cards.
The layout system is one of the best features of Unity. It allows dynamic layout of UI elements during the game without having to write a bunch of code.
It is well worth spending some time reading the Unity manual about layout.
What I have done for this game is create a container for the cards and given it the Horizontal layout. This container will now arrange its children horizontally within it.
When I tell the layout to control the child width and height, the parent container will change the size of the children so that they all fit in the parent. The layout looks at the “Layout Element” behavior on the children for hints about how to do the layout and what size they should be.
Here, I’ve told the card and the spacer how wide I want them to be. If there is room, they will be set to that width. If there are too many cards to fit in the area, the horizontal layout will shrink them proportionally till they fit.
To make the spacer, simply create an empty object and add the “Layout Element” behavior and set the preferred width to 160.
Add a few cards and spacers to the card region of the player area to see if it looks right:
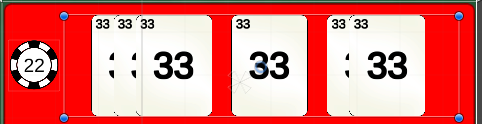
That is about what I was imagining. Next I want to show they player’s current score. This could just be a couple text elements, but I have plenty of space in this game, so I’m going to also display how the score is calculated. Below the chips and cards I’m going to add a score calculation. It will look something like:
“score: chips – lowest card of sequence 1 – sequence 2 – lowest card of sequence 3 = total”
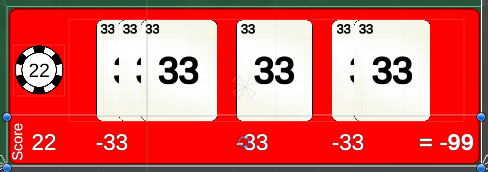
The “Score” text on the left and the “= -99” text on the right are just TextMesh objects.
The only tricky part of this is to get the numbers for the cards to line up under the card itself, since I’m not manually positioning the cards. To accomplish this, I’ll just add the score text element to the Card object itself. I’ll turn off that text if the card is part of a sequence. Apply the changes to the card prefab after adding the score text.
So now the player area looks like this:
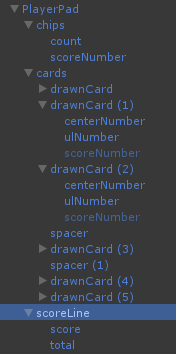
The final steps are to setup the scripting hooks for drawing this area dynamically. I set the “Tag” to “Player”, add the PlayerGUI behavior, remove all the cards and spacers from the card region, and make the area into a Prefab.
Now I copy the player area just like I did with the login area while building the main menu, arranging three pads on the bottom, one on the left and three on the top. I set the position member variable the same way as I did for the main menu.
why not just reuse the same UI for login and play?A simple game like “No Thanks!” probably doesn’t need a separate Main Menu canvas and Game Canvas. Instead, I could put all the Main Menu controls and Game elements onto the same canvas and just hide one or the other based on the game mode.
Then I could have also re-used the player login area and play area, again hiding UI elements based on the game mode.
For a larger game, I like keeping things separate the way that I am demonstrating here. The player area is usually a busy space with a large amount of code behind it and it is even bigger with the login elements.
I used to make separate Unity scenes for the main menu and game. One advantage was that I could re-load the whole scene to reset the game (for undo. More about undo later). But that leads to even more duplication of effort as much of the controller has to be put into both scenes.
Step 8 – Create the Player Dialogs
Follow along with the video.
In most games, I use dialogs to request information from the player and to display information that is situational and that I don’t have room for on the main display. I’ll typically make these dialogs draggable so that the player can move them out to show information on the board or player area.
The dialogs are created on the dialogCanvas which keeps them above the rest of the board elements. I normally have a prefab called the playerDialog that has the PlayerDialogGUI behavior attached. When the PlayerAreaGUI initializes, it instantiates the prefab on the “dialogCanvas”. Add the tag “dialogCanvas” and set the “dialogCanvas” Tag to “dialogCanvas”. This tag is how the PlayerGUI script finds the canvas in the scene.
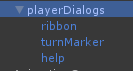
For “No Thanks!” I’ll put the place ribbon and the turn marker in the dialog. The place ribbon is shown at the end of the game. The turn marker will use used to both mark the current player, and as a button to take the current card and chips.
To create the player dialog prefab, make an empty object the same size and position as the player area. Add the behavior “PlayerDialogGUI” to this object.
The “PlayerDialogGUI” expects a ribbon object and a help dialog object. These are elements that I use in almost every game, so I leave the code to control them in the re-use. This game wont have a help dialog, so simply create an empty object as a child of the playerDialog and assign it to the helpDialog member.
For the ribbon, create an image with a ribbon sprite and position it in a reasonable place. Add the “Draggable” behavior so that the player can move it.
More about the Draggable behaviorBy adding “Draggable” to any object, that object responds to drag events and follows the cursor/finger. I added to any object that the player should be able to move around freely. Typically these are dialog windows and the place ribbon because the player may want to see information obscured by these objects.
The “Draggable” behavior can be copied and customized to handle start/end drag events if you want something to happen based on when/where an object is dragged.
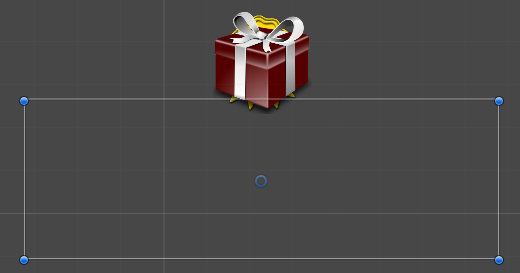
Finally, add another Image object as a child of the PlayerDialog for the turn marker. Use the present sprite. Eventually we will add a button behavior to this object so the player can tap the present icon to accept the current card and chips.
Drag the “playerDialogs” to the prefab directory and then move it down below the visible area of the screen. I leave a copy of the “playerDialogs” out of the way on the screen because I usually have to modify it frequently during development.
Step 9 – Create the Center UI
Follow along with the video.
In the center of the screen I need to show the gift card deck, the current card that players are bidding on and the number of chips already bid.
Create a container for all of these elements. Putting a set of objects into a parent container keeps the hierarchy cleaner and allows you to move and rotate a group of objects together. Make this object 200×175
Create an image object and name it “deck”. Set the sprite to the card back. Set the size to 96×128 (the same size we used for a card in the player area). Set the position and anchor to the upper left (use the ALT key).
Add a TextMesh child of the deck and make it white with a black outline by dragging the outline material that we created while making the title onto the TextMesh behavior. Set the font size as large as possible while still fitting the text “(33)” on the card. Make the text centered on the card.
Drag a card prefab object from the Prefab directory onto the center container. Set its position and anchor to upper right and hide the “scoreNumber” child.
Add an Image object, name it “chips” and give it the Chip sprite. Position it in the bottom right. Give it a child TextMesh object named “count”. Make the text black and large enough to show “22”. Why 22?
I’ll also add a “deck description” element to the center. This will be a TextMesh object positioned in the bottom left with the text “3-35 with 9 cards removed”. This is just a helpful reminder of how we built the deck at the start of the game.
Finally, move the parent object to the center of the screen and set its rotation to -90.

The “drawnCard” child is blue because it is a prefab. I’m using the same card prefab in both the center and in the player areas. If I want to change how the card looks, I can change it in the center and “apply” those changes to the prefab so that the player areas will display it the same way.
Step 10 – Add code to model the game and draw the UI
Follow along with the video.
Now that we have the UI laid out, it is time to add code to draw the UI based on the state of the game.
Game Model
Before I can write code to draw the UI, I need to add code to model the state of the game.
State that we need for “No Thanks!”:
- Game state (state that is non-player specific)
- The shuffled deck of gift cards
- The current card being bid on.
- The number of chips already bid.
- Player state
- Number of chips remaining.
- Gift cards taken.
To model this state, I’ll add code to the re-use classes Game.cs and Player.cs
For Game.cs, I’m going to model both the deck of cards and the current card as a single List<int>. The only important thing about a card is its value, so I’m not going to make a class to represent a card. And there is always a card showing, so the first element of the list can be assumed to be the card we are currently bidding on. The number of chips in the center is just another int.
public List<int> GiftDeck = null;
public int NumCenterChips = -1;
public void init()
{
  // Reset any state here. When we undo, all the events are re-executed and the first event will
  // call this function to cleanup the old game state.
  GiftDeck = new List<int>();
  NumCenterChips = 0;
}
For Player.cs, I’m also going to add a List<int> to represent the cards taken and an integer number of chips remaining. The PlayerGUI is also going to need to draw the total score, so I’ll add a function in the Player to calculate that:
public int NumChips = -1;
public List<int> AcceptedGifts = null;

public Player() {
  NumChips = 0;
  AcceptedGifts = new List<int>();

  for (int i = 0; i < (int)Statistic.NUM_TYPES; ++i)
    Statistics[(Statistic)i] = 0;
}
  public int totalScore()
  {
    int giftTotal = 0;
    int priorGift = -1;
    foreach ( int gift in AcceptedGifts )
    {
      if (gift != priorGift + 1)
        giftTotal += gift;
      priorGift = gift;
    }
    return NumChips - giftTotal;
  }
The totalScore() function assumes that the list of AcceptedGifts is sorted. I’ll also want to draw the cards in sorted order, so I’ll keep the AcceptedGifts list sorted:
public void TakeGift(int gift)
{
  AcceptedGifts.Add(gift);
  AcceptedGifts.Sort();
}
More about model init functions.You may have noticed that the Game object has an init function while the Player object uses a constructor.
This is just an artifact about how a game is “reset” or initialized. The Game behavior is added to the Control object in the scene and persists during an undo/reset. So the EResetGame event, which is the first event in the timeline, calls Game.init() to reset the game state.
The Player isn’t a behavior and is created by the event system when processing the EAddPlayer events. So, when we reset and reprocess the events during an undo, the PlayerList is cleared and new Player objects are created.
EInitialize
Next, I’ll initialize the game model. This is handled by the EInitialize event which is executed after the game has been created and the players have been added.
For “No Thanks!”, I need to build and shuffle the deck, remove 9 cards (or keep 24) and give the players chips. The number of chips the players get depends on the number of players in the game.
public void initializeModel()
{
  Player startPlayer = PlayerList.Players.GetRandom();
  PlayerList.setOrderToClockwiseWithStartAt(startPlayer);
  Game.theGame.CurrentPlayer = startPlayer;
  Game.theGame.CurrentGameState = Game.GameState.PLAY;

  List<int> allCards = Enumerable.Range(3, 33).ToList();
  allCards.Shuffle();
  Game.theGame.GiftDeck = allCards.Take(24).ToList();
  Game.theGame.NumCenterChips = 0;

  foreach (Player player in PlayerList.Players)
  {
    if (PlayerList.Players.Count == 7)
      player.NumChips = 7;
    else if (PlayerList.Players.Count == 6)
      player.NumChips = 9;
    else
      player.NumChips = 11;
  }
}
Card UI
Since I need to draw cards in both the player area and the main UI, I’ll create a CardGUI class that I can add to the card prefab to handle drawing.
In Unity, create a new script in the Assets/Scripts/gui directory called CardGUI.
This class is going to need to set the three text elements to match the value and will need to hide the “score” text element for some cards.
public class CardGUI : MonoBehaviour {

  public TMPro.TextMeshProUGUI CenterNumber;
  public TMPro.TextMeshProUGUI ULNumber;
  public TMPro.TextMeshProUGUI Score;
  public void draw( int number, bool showScore)
  {
    CenterNumber.text = ULNumber.text = number.ToString();
    Score.text = showScore ? "-" + number : "";
  }
}
Switch back to Unity and add this behavior to the Card in the center. Drag in the three text objects. Hit “apply” to save these changes to the prefab.
Game UI
The GameGUI script is going to need to draw the number of cards in the deck, the number of chips in the center and the card being bid on.
I’ll add those as members of the GameGUI:
  public TMPro.TextMeshProUGUI DeckSizeText;
  public GameObject OfferedChips;
  public CardGUI OfferedGift;
I’m now ready to write the code to draw the center area. I’ll add this to the GameGUI.draw() function:
  public void draw()
  {
    LoadOverlay.SetActive(Game.theGame.CurrentGameState == Game.GameState.LOGIN);
    GameCanvas.SetActive(Game.theGame.CurrentGameState != Game.GameState.LOGIN);

    OfferedChips.GetComponentOnChild<TMPro.TextMeshProUGUI>("count").text = Game.theGame.NumCenterChips.ToString();
    OfferedChips.SetActive(Game.theGame.NumCenterChips > 0);

    DeckSizeText.text = "(" + (Game.theGame.GiftDeck.Count - 1) + ")";

    if ( Game.theGame.GiftDeck.Count > 0 )
    {
      OfferedGift.gameObject.SetActive(true);
      OfferedGift.draw(Game.theGame.GiftDeck[0], false);
    }
    else
      OfferedGift.gameObject.SetActive(false);

    foreach (PlayerGUI pad in theGameGUI.PlayerPads)
    {
      pad.draw();
    }
  }
The function GetComponentOnChild<T>(name) that I use to find the TextMesh child of the chips is a convenient, but error prone way to locate an object in the scene. It saves having to create a variable and drag in each UI element that the script code is going to modify. However, it then constrains the naming and potentially the organization of the hierarchy. If the name of the object doesn’t match, or is changed later, the code will break. Make sure that you use the same name in the script code as you used on the UI.
Switch back to Unity and link up the deck size text, the “chips” image and the “drawnCard” to the members of the GameGUI behavior on the “Control” object. Also add all the “PlayerPad” objects to the GameGUI’s member “Player Pads”. Remember that you can lock the inspector and drag all the objects in at once.
More about the draw() functionThe draw() function provided by the GameGUI (and other UI classes) is called by the act() function of events. When an event happens in real time (as opposed to load or undo), the timeline controller calls the act() function right after the do() function. The do() function updates the model and the act() function updates the UI. The act() function will often do some kind of animation and play sounds. When the animation is complete, the act() function will call the draw() function of whatever UI element has been changed.
PlayerPad UI
Like the GameGUI, the PlayerGUI will need to modify several UI elements. It is going to need links to the total score text element, the number of chips, the card container and both the card and spacer prefabs.
  public TMPro.TextMeshProUGUI TotalScore;
  public GameObject Chips;
  public GameObject CardPrefab;
  public GameObject SpacerPrefab;
  public Transform CardContainer;
Next I’ll add the custom draw code. I’ll set the color of the Image to the player’s color so that the player area shows their color.
I’ll set both child text elements of the chip to the number of chips (this is the text on the chip itself and the text in the score calculation). I’ll set the total score text to the current score.
Then, the tricky part is to draw the card area. I don’t want to re-draw this region if nothing has changed, so I’ll keep the list of cards that I last drew and if it hasn’t changed, I’ll leave the area alone. However, I’m going to be lazy about how I draw this region when things have changed. I’d really just need to add the new card in the correct location, but I’ll just re-create the whole region. draw() isn’t something that is called every frame. Instead it is just called to update the UI when it changes due to a player action.
  bool _isAnimating = false;
  List<int> _drawnCards = new List<int>();
  public void draw()
  {
    if (_isAnimating) return;
    if (Player == null) return;

    // Set the player area to match the player color
    GetComponent<Image>().color = Player.solidColor();

    foreach (var text in Chips.GetComponentsInChildren<TMPro.TextMeshProUGUI>())
      text.text = Player.NumChips.ToString();

    TotalScore.text = "= "+Player.totalScore();

    if (Player.AcceptedGifts.Count != _drawnCards.Count)
    {
      CardContainer.gameObject.DestroyChildrenImmediate();
      _drawnCards = new List<int>(Player.AcceptedGifts);
      int priorGift = -1;
      foreach (int gift in _drawnCards )
      {
        if ( priorGift != -1 && gift > priorGift+1 )
        {
          GameObject spacer = Instantiate(SpacerPrefab);
          spacer.transform.SetParent(CardContainer, false);
        }
        GameObject card = Instantiate(CardPrefab);
        card.GetComponent<CardGUI>().draw(gift, gift > priorGift + 1);
        card.transform.SetParent(CardContainer, false);

        priorGift = gift;
      }
    }

    DialogGUI.draw();
  }
Switch back to Unity and link up the parts of the player area with the new members that we have created. Also set the “Player Dialog Prefab” by dragging in the “playerDialogs” from the prefab directory. Remember to apply the changes to the prefab.
Player Dialog UI
The re-use code for the PlayerDialogGUI will draw the ribbon when the game state is GAME_OVER, but I need to add code to draw the Gift Icon when it is the player’s turn:
  public GameObject GiftIcon;

  public void draw()
  {
    gameObject.SetActive(true);
    Ribbon.gameObject.SetActive(Game.theGame.CurrentGameState == Game.GameState.GAME_OVER);
    Ribbon.sprite = GameGUI.ribbonSprite(ParentGUI.Player.Place);

    GiftIcon.SetActive(Game.theGame.CurrentGameState == Game.GameState.PLAY &&
                       ParentGUI.Player == Game.theGame.CurrentPlayer);
  }
The last line in the draw() function will make the Gift icon visible if it is the current player’s turn and we are playing the game (not GAME_OVER or INIT).
More about game statesThe re-use game class has a member variable and an enumeration for storing the state of the game. In complex games, single state variable can be replaced with a “state stack” to keep track of state like: TAKE_ACTION -> MARKET_ACTION -> SELL. In a very complex game, I’ll replace the enum with an actual state class to store state specific game state.
For this game, there are really only two states, PLAY and GAME_OVER. The EInitialize event puts the game in PLAY state. Eventually, another event will detect that the gift deck is exhausted and put the game in the GAME_OVER state.
Switch back to Unity and set the Gift Icon member of the Player Dialog GUI. Apply the change to the prefab.
Run
You should now be able to hit play and see the UI drawn to match the initial state of the game. Running with the MainMenu Canvas turned off and the GameCanvas turned on will automatically load the last game as though you started on the MainMenu and hit the “Resume” button.
If something isn’t working and you can’t figure it out. You can download a zip of my project at this point: NoThanks-UIBuilt
One thought on “Board game programming tutorial – Part 2”