This is the third part in my tutorial for converting a board game for a touch table using Unity.
The first part covered all our reuse code and conventions, setup the project and created a main menu.
The second part built the UI for a very simple game called “No Thanks!”.
This part will write the events to control the game, add buttons to the UI for the players to use to play the game, and finally add animations to the game.
There is a set of videos to go along with this post which show all the steps that I perform in the Unity game builder.
- Part 6 – Events and callbacks
- Part 7 – Animation and sound effects
- Part 8 – Load screen, version number and building
I’ve also saved my Unity project as of the last blog post and as a completed game. If something hasn’t worked for you, you can compare with my project.
- NoThanks-UIBuilt (steps 1-10 complete)
- NoThanks-Final (project finished)
- Touch – Describes multi-touch handling in Unity and passing touch events to the Unity UI
- Utilities – Covers all the utility classes and functions that we’ve created over time
- Game Model – The “Model” part of the Model/View/Controller pattern
- View – The skeleton classes for running the GUI
- Event System – The “Controller” part of the Model/View/Controller pattern
- Events – The events that are common to all our games.
Step 11 – Add player control buttons and events.
The player’s need to be able to tell the game whether they are going to take the currently offered gift or pay a chip.
I’ll add buttons to the Gift and Chip images on the player interface. Optional: highlighted buttons
These buttons will call functions in the PlayerGUI and PlayerDialogGUI when they are clicked. These callback functions will check if the player can really execute the action and then add the control event to the timeline.
In most games I put code to check the validity of a player action either in the button callback or in the draw code. If the game needs to tell the player why a particular action isn’t valid, then I’ll put the code in the button callback and use the WindowsVoice plugin to speak an error message. If a message isn’t needed, then the draw function will simply make the button inactive. I use this second method if I’ve made separate active and inactive graphics for the button.
So the button needs a callback function and the callback function needs to create an event, so I’ll start by creating the events. I use a convention of starting the names of events with either ‘E’ for an engine event and ‘P’ for a player event. So I’ll create two events – PTakeCard and PPayChip.
PTakeCard
PTakeCard is a PlayerEvent. This is the base class for events created by player actions. The constructor requires the player taking the action. The class defaults QContinueUndo to false and provides convenience functions to return the player and the player’s GUI.
The code should look like this:
public class PTakeCard : PlayerEvent
{
  public PTakeCard() : base(Game.theGame.CurrentPlayer) { }

  public override void Do(Timeline timeline)
  {
    _player.NumChips += Game.theGame.NumCenterChips;
    Game.theGame.NumCenterChips = 0;
    _player.TakeGift(Game.theGame.GiftDeck.Pop(0));

    if (Game.theGame.GiftDeck.Count == 0)
      timeline.addEvent(new EEndGame());
  }
  public override float Act(bool qUndo = false)
  {
    GameGUI.theGameGUI.draw();
    return 0;
  }
}
The “Do” function is call whenever the event is executed or re-executed (due to load or undo). This function is responsible for updating the game model.
For PTakeCard, the “Do” function gives the player the chips in the center and the top card. It also checks to see if we are out of cards and, if so, ends the game.
The “Act” function is only called when the event is first executed. This function is responsible for updating the UI to match the new game state. It can also, optionally, animate the UI or play sound effects. Since the “Act” function isn’t called during load or undo, animations and sounds will only happen for real-time events.
For now, I’ll just have the “Act” function re-draw the UI. I’ll add sounds and animations later.
PPayChip
PPayChip is another Player event. The code looks like this:
public class PPayChip : PlayerEvent {

  public PPayChip() : base(Game.theGame.CurrentPlayer) { }

  public override void Do(Timeline timeline)
  {
    --_player.NumChips;
    ++Game.theGame.NumCenterChips;
    Game.theGame.CurrentPlayer = PlayerList.nextPlayer(_player);
  }
  public override float Act(bool qUndo = false)
  {
    GameGUI.theGameGUI.draw();
    return 0;
  }
}
The player pays a chip and the center gets the chip. The CurrentPlayer is set to the next player.
Callbacks
Add the chip callback to the PlayerGUI. This code needs to check if the player can really pay a chip. First of all, it needs to be that player’s turn. Since the chip is always displayed on the player’s UI, we can’t let just any player to click their chip button. Second, the player needs to have chips to spend.
  public void OnPayChipClick()
  {
    if ( Player == Game.theGame.CurrentPlayer )
    {
      if (Player.NumChips > 0)
        Timeline.theTimeline.addEvent(new PPayChip());
      else
        WindowsVoice.speak("Out of chips");
    }
  }
The take card callback in PlayerDialogGUI doesn’t need any check. The Gift icon is only shown for the current player and a player can always accept the card.
  public void OnAcceptGiftClick()
  {
    Timeline.theTimeline.addEvent(new PTakeCard());
  }
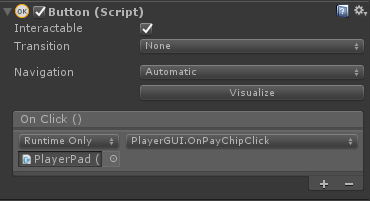
Add a button behavior to the Chip on the player UI. Set the transition to none and set the OnClick callback to PlayerGUI.OnPayChipClick. Apply the change.
Similarly, add a button behavior to the GiftIcon in the “playerDialogs” and set the OnClick callback to PlayerDialogGUI.OnAcceptGiftCallback. Apply the change.
Undo/SaveAndExit Buttons
Create buttons on the Game UI to allow the players to quit and undo an action.
When to allow undo?If new information is revealed by a player’s action, undo may not be appropriate. In this game, if a player takes a card, the next card is going to be revealed. So, should the player be allowed to undo?
In my opinion, the software should not enforce a rule on the players. If the other players want to allow the undo, the software shouldn’t prevent it.
Re-shuffle after undo?
When the player does undo, should the deck be re-randomized so that a different card is drawn? This may make it harder for players to take advantage of information they shouldn’t have seen.
The default behavior of the Timeline engine is to leave the random generator alone so that you will get the same result after an undo. If you do want re-shuffle the deck, you need to always re-shuffle before any draw. The game can’t tell if there has been an undo, so you need to have code like:
[code language=”csharp”] public int? Seed;public override void Do(Timeline c)
{
if( !Seed.HasValue )
Seed = Mathf.Abs(System.DateTime.UtcNow.Ticks.GetHashCode());
UnityEngine.Random.InitState(Seed.Value);
Game.theGame.Deck.shuffle();
Card = Game.theGame.Deck.pop(0);
}
[/code]
The first time this event is executed, it will pick a new seed for the random number generator, save that seed and then use it to shuffle the deck and draw a card.
When this event is saved and re-executed during a load, it will see that it already has a seed and use that seed to init the random number generator. This will result in the same shuffle and draw as the first time.
However, if this event is undone it is deleted, and the next time a card needs to be drawn, a new event will be created which will create a new seed and a new shuffle result.
Add a UI/Button to the “GameCanvas”. Set the sprite to “RectButton_0”, set the transition to “Sprite Swap” and the disabled sprite to “RectButton_1”. Add an OnClick callback of GameGUI.saveAndExit. Delete the child text and replace it with a TextMesh object that is black and has the text “Save and Exit”. Set the rotation to -90 and position it on the right side of the screen.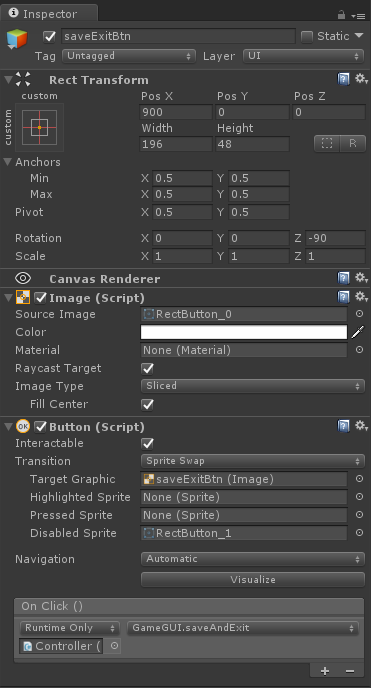
Repeat that procedure for the Undo button and make the callback GameGUI.undoAction.
Testing
The game is now “complete” in that players can log into the game, play a full game of “No Thanks!”, determine the winner and allow the players to exit the game.
I still need to add animations and sounds to the main game, a load screen to the main menu and probably cleanup the score region on the player area which seems to get a bit crowded when a player has taken lots of cards.
Step 12 – Animations and sound
I’m going to start by adding animations to the PPayChip and PTakeCard events. These animations will be added to the act() functions and will replace the calls to GameGUI.draw() which immediately drew the entire UI.
All the draw() functions in the GUI classes immediately draw the UI to match the game model. The act() function is called after the do() function, so any draw() function will draw the updated model.
So, when I animate a UI element moving from the center of the board to a player area or vise-versa, I need to draw the source of the move immediately and the target of the move after the animation is complete.
For example, if I’m moving an accepted gift card from the center to the player area; I can’t draw the player area immediately because it would then show the taken card before it arrives. But I do need to draw the center immediately so that the card disappears.
So here is the basic flow:
- Create a copy of the object that is going to move (like the card in the center)
- Setup an animation of that copy using DoTween.
- Call draw() on the parent/owner of the object being moved.
- Wait till the animation is complete and call draw() on the parent/owner of the target of the object.
This pattern can cause problems if there are multiple objects moving some from and others to the same area. In fact, “No Thanks!” will have this problem when the player takes a card. The card and chip will be animated from the center to the player area, but the gift icon will be animating from the player area to the next player.
Self animating GUI patternAn alternate way to create game animations is to have the draw() functions in the GUI classes do the animations. To do this, the GUI classes need to compare the way the UI is currently drawn to the model and animate from the old UI state to the new model state.
This can work quite well for some types of data, but is not really suited for cases where model changes can be caused by different actions which need to be animated differently.
PPayChip.act()
When the play pays a chip to the center, I want to animate the chip moving from the player area to the center and the gift icon that marks the current player moving from the current player area to the next player area.
Keeping in mind that the game model has already been updated and that any draw() call will draw the new state, the pseudo code to do these animations is:
- Make a copy of the chip on the acting player’s area.
- Delete the text on the copy
- Animate the copy to the center over 1 second
- Make a copy of the gift icon on the acting player’s area.
- Animate the copy to the next player’s area over 1 second.
- Draw the acting player’s area (this updates the chip count and hides the gift icon)
- -Wait 1 second-
- Delete all the copies
- Draw the center area to update the chip count
- Draw the next player’s area to show their gift icon
The first step is to break up the GameGUI.draw() function to provide a way to draw the center of the screen without drawing the player areas. I’ll make a function called GameGUI.drawCenter() that the GameGUI.draw() function calls.
Here is the script code to implement the pseudo code above:
More about GameGUI.cloneOnCanvascloneOnCanvas creates a copy of the given object on the AnimationCanvas in the same position, size and rotation as the given object. It also resets the anchors and pivot of the copy. Because of the way Unity draws UI elements and the differences between the Transform and the RectTransform, positioning an object that doesn’t pivot around the center is non-intuitive.
  using DG.Tweening;
  public override float Act(bool qUndo = false)
  {
    GameObject chipCopy = GameGUI.cloneOnCanvas(_gui.Chips);
    chipCopy.DestroyChildrenImmediate();
    chipCopy.transform.DOMove(
      GameGUI.theGameGUI.OfferedChips.transform.position, 1f).
      OnComplete(() =>
      {
        GameObject.Destroy(chipCopy);
        GameGUI.theGameGUI.drawCenter();
      });

    PlayerGUI nextPlayerGUI = GameGUI.currentPlayerPad();
    GameObject giftCopy =
      GameGUI.cloneOnCanvas(_gui.DialogGUI.GiftIcon);
    giftCopy.transform.DOMove(
      nextPlayerGUI.DialogGUI.GiftIcon.transform.position, 1f).
      OnComplete(() =>
      {
        GameObject.Destroy(giftCopy);
        nextPlayerGUI.draw();
      });
    giftCopy.transform.DORotate(
      nextPlayerGUI.transform.rotation.eulerAngles, 1f);

    _gui.draw();

    return 0;
  }
To do the actual animation, I’m using the DoTween plugin. The DOMove and DORotate functions move and rotate the transform to the given position/rotation over the given time. The Tween.OnComplete function creates a callback that is executed after the animation is complete.
PTakeCard.act()
Next I’ll write the act() code for PTakeCard. This is slightly more complicated since there are more moving parts, but the basic idea is the same. I’ll make copies of the center chip and center card. Those will be animated to the player’s area. Then the center area will be drawn. After a second the player’s area will be drawn. I’d also like to animate the new card being drawn from the deck. So, after drawing the center area (which will update the center card with the new number), I’ll move the center card over to the deck and animate it to its normal position.
Another complication is that the chip shouldn’t be animated if there weren’t any chips taken. The only way for the Act() function to know how many chips were taken is for the Do() function to save that data.
  using DG.Tweening;
  private int _numChips = 0;
  public override void Do(Timeline timeline)
  {
    _numChips = Game.theGame.NumCenterChips;
    ...
  }
  public override float Act(bool qUndo = false)
  {
    // Center card
    GameObject movingCard =
      GameGUI.cloneOnCanvas(GameGUI.theGameGUI.OfferedGift.gameObject);
    movingCard.transform.DOMove(_gui.CardContainer.position, 1f).
      OnComplete(() =>
      {
        GameObject.Destroy(movingCard);
        _gui.draw();
      });
    movingCard.transform.DORotate(_gui.transform.rotation.eulerAngles, 1f);

    // Center chips
    if (_numChips > 0)
    {
      GameObject movingChip = GameGUI.cloneOnCanvas(GameGUI.theGameGUI.OfferedChips);
      movingChip.transform.DOMove(_gui.Chips.transform.position, 1f).
        OnComplete(() => GameObject.Destroy(movingChip));
      movingChip.transform.DORotate(_gui.transform.rotation.eulerAngles, 1f);
    }

    GameGUI.theGameGUI.drawCenter();
    // New center card
    GameGUI.theGameGUI.OfferedGift.transform.DOMove(
      GameGUI.theGameGUI.DeckSizeText.transform.position, 1f).
      From().
      SetDelay(0.5f);
    return 0;
  }
The last line is interesting. I’m using the DoTween.DOMove capability to animate the card like before, but I’m calling Tween.From() to reverse the animation and .SetDelay(1f) to start the animation after 1 second.
Testing this code, I noticed two problems:
The animationCamera needs a “depth” that is larger than the “depth” of the MainCamera so that it is drawn second.
Since I’m not making a copy of the center card, I need it to have a pivot of 0.5,0.5 or it doesn’t animate correctly.
Audio
Next I’m going to add some sound effects to the game. The first step is to add the names of the effects to the AudioPlayer.AudioClipEnum and then fill in the array of clips in the AudioPlayer behavior (which was added to the Control object).
There are three more audio clips for this game:
- CardFlip – A card being flipped over, for use when a new gift card is drawn
- Coin – A coin falling on another coin, for use when the player pays a chip
- Shuffle – A deck of cards being shuffled at the start of the game
public class AudioPlayer : MonoBehaviour
{
  public enum AudioClipEnum
  {
    INVALID = -1, INTRO, CLICK,
    CARD_FLIP, CHIP, SHUFFLE
  }
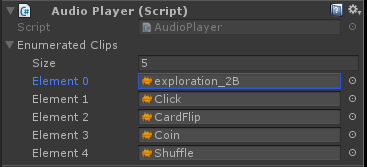 At the start of the game, the EInitialize function shuffles the deck. The default EInitialize.act() function just draws the UI. I’ll add code to have it play the shuffle sound.
  public override float Act( bool qUndo )
  {
    AudioPlayer.PlayClip(AudioPlayer.AudioClipEnum.SHUFFLE);
    GameGUI.theGameGUI.draw();
    return 0;
  }
When the player pays a chip, I want to play the chip sound once so I’ll add the code: AudioPlayer.PlayClip(AudioPlayer.AudioClipEnum.CHIP); to the PPayChip.Act() function.
When the player takes the card, I want to play the chip sound once per chip taken and the card flip sound once:
  public override float Act(bool qUndo = false)
  {
    AudioPlayer.RepeatClip(AudioPlayer.AudioClipEnum.CHIP, _numChips);
    AudioPlayer.PlayClip(AudioPlayer.AudioClipEnum.CARD_FLIP, 1f);
    ...
  }
The second parameter to AudioPlayer.PlayClip is the delay before playing the sound.
Step 13 – Load and version number
When I built the main menu, I skipped a few steps so that I could get into building the game. Now I will go back and finish the main menu by adding a version number and a load screen.
Version Number
First I’ll add a version number. This is just a text UI object with the “Version Info” behavior.
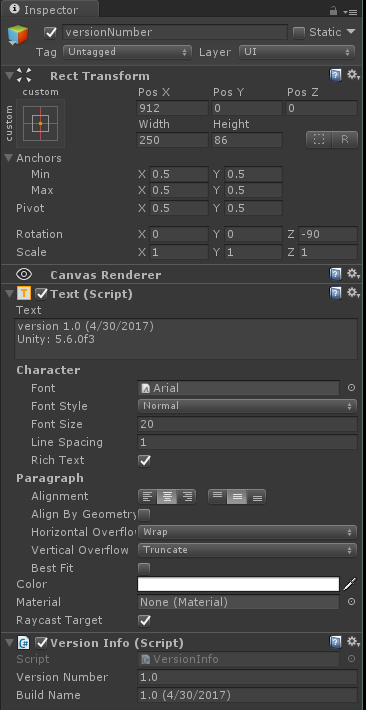
Add a Text object to the top level of the MainMenu, add the “Version Info” behavior, set the version number to 1.0, move the object to the right side of the screen and rotate it to face the left. Make the font bigger and the text white. Hit “play” to force the script to update the text.
Adding a version number seems a bit silly, but it really does save a lot of time once you start building standalone executables, because you can be sure that you have deployed the latest version before testing.
Load Screen
I’ve already built a load canvas, and the Load button is hooked up to the re-use code, so clicking load will show the load canvas. Now I need to create the Load UI and hook up the rest of the member data in the re-use code.
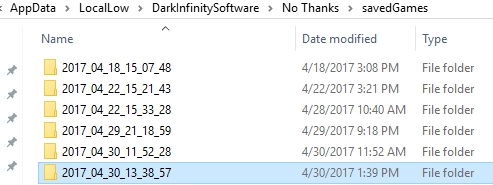
Load/Save works by using Unity’s Application.persistentDataPath. On windows, this variable expands to %APPDATA%/LocalLow/<CompanyName>/<ProductName>. I create a sub-directory there called “/savedGames”. When a game is started, it automatically saves the startup events to a sub-directory named “yyyy_MM_dd_HH_mm_ss”. When the player hits the “Save and Exit” button on the GameGUI, the Timeline is told to save the current events to that same directory. At this time, the re-use code also takes a screenshot of the game and saves that to the same directory.
So, after playing a few games, my save directory looks like this
The MainMenu re-use script has code to parse the save directory and create a game tile on the Load Panel for each saved game. This bit of re-use code is pretty raw and makes some big assumptions about what UI elements are on the LoadCanvas.
First, I’ll add a Panel to the LoadCanvas. This has to be named “Panel”. The panel should take up the whole screen and be fully opaque.
It should have a child panel named “title” that takes up the top 60 pixels. The “title” panel should be a darker grey and have two children:
- A TextMesh object that is centered and has the text “Saved Games”
- A button on the far right that is colored red and has a child text element with the text “X”. The callback should be MainMenuGUI.OnLoadButton()
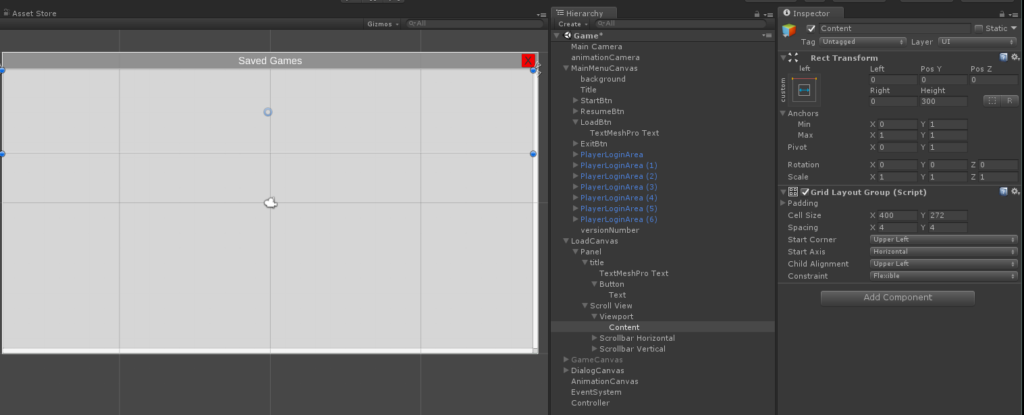
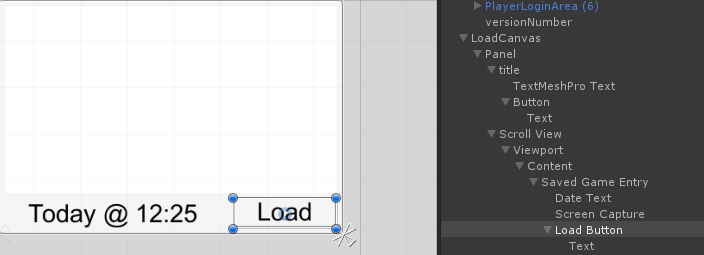
The “Panel” object should have a second child that is a “Scroll View”. Add a “Scroll View” with the Unity menu and leave all the names as their default values. Set it to fill the parent with a Top of 64 pixels. In the content of the viewport, add a grid layout with a size of 400×272 and a spacing of 4×4. When everything is created, it should look like this:
Next we create a prefab for the saved game tile which will be added to the Scroll View/Viewport/Content for each saved game.
Add a button to the Content object. The grid layout will automatically size the button. We don’t need to set the callback since that is done in the re-use script when it creates the button. Name the button “Saved Game Entry”
The “Saved Game Entry” button should have three children
- A “Raw Image” object named “Screen Capture” sized to fill the area with a border of 48 on the bottom.
- A “Text” object named “Date Text” positioned on the bottom left and set to Auto Fit the text size
- A “Button” object named “Load Button”. Remove the button behavior and add a child text object with the text “Load”.
When you are done, the “Saved Game Entry” should look like this:
Make the “Saved Game Entry” a prefab by dragging it into the Prefab directory. Then delete it out of the Scroll View.
Drag that prefab into the MainMenu’s “Saved Game Entry Prefab” member on the “Controller” object.
Hide the “LoadCanvas” and run the game. The load button should now bring up the LoadCanvas populated with the saved games. The red “X” button should close the dialog, and clicking on any of the game tiles should load that game.
Building for Windows
To build an executable that will run on windows, save the scene, then bring up the “Build Settings” window under the file menu.
Click “Add Open Scenes” and change the architecture to “x86_64”. Click the “Build” button and pick a directory to build in.
Step 14 – Cleanup
This tutorial is now complete. You can download a zip of the completed project NoThanks-Final.
There are several more things that I will do for my own version of this game:
- Fix the text on the deck of cards so that it says “(0)” instead of “(-1)” at the end of the game.
- Change the scoring so that cards are positive and chips are negative to match the way the board game rules are written.
- Make sure that the score text still looks good if a lot of cards are taken.
- Tweak the new card animation so that it still looks right if a player quickly takes a second card while it is still animating.
- Add a couple variants as options on the main menu.
- Add a “Credits” button and panel to give credit to the board game’s designer, and to the artists who created the graphics I used.
- Re-design the game so that it plays multiple rounds (one per player) and has a scoreboard that adds up the player’s score for each round. The game then ends when the last round is over.
- Make a highlighted chip to show when the button is clickable so that it is obviously a button.
